
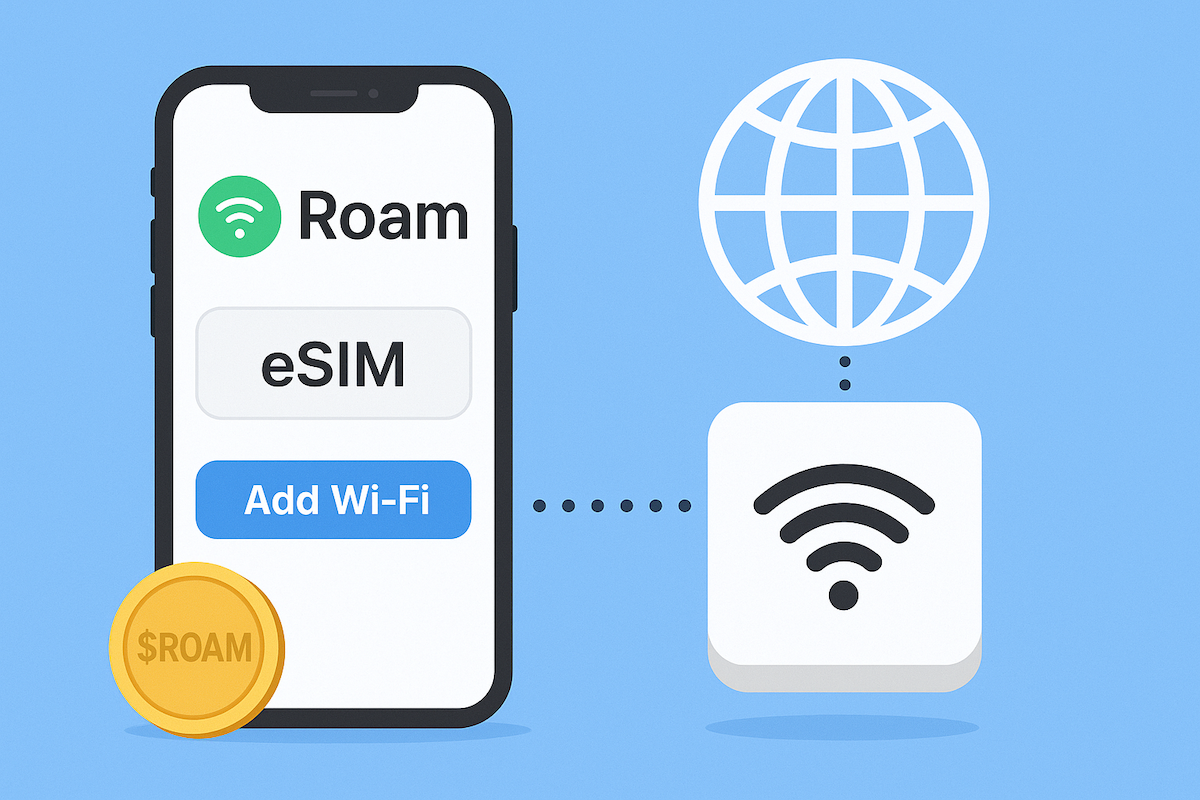
Skip the Roaming: Why Every Traveler Needs an eSIM
Almost 90% of travelers now use an eSIM, a digital SIM embedded in your phone that lets you purchase a local data plan before you arrive. Instead of swapping physical cards, you simply scan a QR code to activate instant connectivity in a foreign country. This eliminates roaming fees and the hassle of finding a local vendor, keeping your primary number active for calls and texts.
Why Ditch the Plastic SIM Card Abroad
Ditching the plastic SIM card abroad eliminates physical swapping and the risk of losing your original SIM. With eSIM for travel, you avoid hunting for local vendors or damaging tiny trays. You can switch networks instantly via a QR code, keeping your home number active for calls or banking verification. There is no need to carry multiple cards or remember which slot holds which plan. This digital approach also prevents unexpected roaming fees if a physical card dislodges. For brief trips, an eSIM offers direct connection upon landing, removing the hassle of queuing at airport kiosks. The primary advantage is complete flexibility without the logistics of managing fragile plastic. Why ditch the plastic SIM card abroad? To streamline connectivity and bypass physical carrier constraints entirely.
Instant Activation Before You Depart
The core advantage of instant activation before you depart eliminates the frantic airport search for a local SIM vendor. You purchase the eSIM online, scan a QR code, and the profile installs immediately over your home Wi-Fi. The plan remains dormant until you land and connect to a local network, at which point it activates automatically without further steps. This workflow ensures your data is live the moment the plane’s wheels touch the tarmac, removing any lag between arrival and connectivity.
Can I activate the eSIM while still at home without starting my plan’s timer? Yes. Installation and activation are separate stages. Installing the profile stores the plan on your device. The ‘active timer’ (e.g., 30 days) only begins once your device registers on a foreign network after departure.
No Need to Hunt for Local SIM Shops
Eliminating the hunt for local SIM shops means you avoid wasting transit time navigating unfamiliar streets or airport kiosks after a long flight. An eSIM activates instantly upon purchase, removing the need to locate a specific store, wait in line, or negotiate language barriers for a physical card. This zero-queue activation ensures you have data the moment you land, not after a tedious errand. It also sidesteps the risk that a shop runs out of stock or has incompatible SIM sizes for your device. No more planning your arrival around retail hours or store locations.
By using an eSIM, you entirely remove the logistical burden of physically finding and buying a local SIM card before you can connect.
Carry Your Home Number Alongside a Foreign Line
With an eSIM, you can carry your home number alongside a foreign line by keeping your primary SIM active for calls and texts while adding a separate, data-only eSIM profile for the destination country. This dual-SIM setup means your usual number remains reachable for banking codes or family calls without swapping physical cards. You simply assign your home SIM for voice and SMS, and the foreign eSIM for mobile data, avoiding roaming fees on your primary line. No need to notify contacts of a temporary number—both lines coexist in one device.
How Digital SIM Technology Actually Works on the Road
When traveling, a digital eSIM works by storing your profile directly on the device’s embedded chip, eliminating the need for a physical plastic card. Before departure, you scan a QR code or install an app to load a carrier’s data plan onto this chip. Your device then uses Over-the-Air (OTA) provisioning to remotely activate the account, connecting you to local towers in your destination. The phone treats this eSIM profile like a standard SIM, managing network authentication and handoffs between cells as you move.
The key insight is that you bypass roaming entirely by activating a local network operator remotely, meaning you gain instant, cost-effective data while keeping your home SIM active for calls.
This digital handshake happens seamlessly in seconds, allowing you to navigate, stream, and stay connected without swapping cards.
Embedded Chips and Remote Profiles Explained
An eSIM for travel works by pairing a tiny embedded chip, soldered right into your phone, with a remote profile that you download over Wi-Fi. That chip is always there, ready to store multiple operator profiles at once. Instead of swapping a plastic card, you buy a plan online, get a QR code or app, and the remote profile magically installs onto the embedded chip. This lets you switch between a home and local travel profile without ever touching a physical slot.
| Embedded Chip | Remote Profile |
|---|---|
| Hardware fixed inside your device | Digital data sent over the internet |
| Stores one or multiple profiles safely | Activates instantly when downloaded |
| Never needs removal or replacement | Can be deleted and re-added on the go |
Compatibility Check: Which Phones Support This Feature
Before traveling, verify your device supports eSIM, as not all phones include the required hardware. Compatibility check: which phones support this feature begins with newer models; for example, Apple’s iPhone XS, XR, and later (excluding Chinese models) work, while Android support spans Google Pixel 3a and newer, Samsung Galaxy S20 and later, and some mid-range phones like the Galaxy A54. Older or budget models often lack eSIM hardware. Use your phone’s IMEI to check carrier-specific compatibility, as some locked devices restrict eSIM activation abroad. A quick online compatibility tool can confirm support before you purchase a travel eSIM plan.
Switching Networks Without Swapping Out Hardware
With an eSIM, you abandon the physical hunt for a local SIM card, as dynamic network selection happens entirely in software. Arriving in a new country, your device scans available carriers and downloads a fresh profile over-the-air from your travel provider. The switch is instant—you tap a menu to activate a Japanese operator while still in the Seoul airport, then switch to a Thai plan mid-flight without touching a slot or tray. Your hardware, including the modem and antenna, stays static; only the digital credential changes, allowing seamless carrier hopping across borders.
Switching networks without swapping out hardware means you buy, install, and activate carrier profiles through software alone, leaving your device’s physical components untouched while changing service instantly.
Picking the Best Connectivity Solution for Your Itinerary
When picking the best connectivity solution for your itinerary with an eSIM, first map your stops. For a single-country trip, a local eSIM from that nation’s provider usually offers the fastest speeds and best value, but for a whirlwind tour across three or four countries, a regional eSIM covering a whole continent saves you from juggling multiple plans. Always check data caps and throttling policies—unlimited plans often slow down after a small daily allowance. For cities, prioritise plans with top-tier network partners, but in remote areas, look for eSIMs that explicitly support multiple local carriers for better coverage. Finally, if your itinerary hops through time zones, pick a plan with 24/7 customer support to avoid wrenching activation hiccups at 3 AM.
Regional Plans vs. Global Passes: What Fits Your Route
Choosing between a regional plan and a global pass hinges entirely on your specific route. If your itinerary sticks to a defined zone—like Western Europe or Southeast Asia—a regional eSIM delivers concentrated coverage without paying for continents you won’t visit. The value spikes through route-specific eSIM optimization, ensuring you only buy bandwidth for the countries on your list. Conversely, a global pass shines when your journey skips across multiple regions, such as hopping from Morocco to Thailand. It bundles disparate zones into one seamless data pool, eliminating the hassle of swapping plans mid-trip.
Data-Only Options Versus Plans with Voice Minutes
For most travelers, data-only eSIM plans are the smarter bet, as they cover maps, messaging, and ride-hailing without the bloat of unused voice minutes. Voice-minute plans matter only if you’ll call local taxis, hotels, or restaurants direct—otherwise, Wi-Fi calling via WhatsApp or FaceTime bypasses the need entirely. A quick comparison clarifies the trade-off:
| Aspect | Data-Only Plan | Plan with Voice Minutes |
|---|---|---|
| Cost | Cheaper per day | Often 30–50% pricier |
| Real Need | Apps replace calls | Only if no Wi-Fi access |
| Setup | Instant activation | May need verification |
Stick with data-only unless you’re traveling off-grid or need to make old-school phone reservations—then a voice-plan add-on is worth the extra dollar per day.
Prepaid Top-Ups Versus Subscription Services
When choosing between prepaid top-ups and subscription services for your travel eSIM, flexibility clashes with convenience. Prepaid top-ups let you buy data in bursts, ideal for short trips or unpredictable usage, as you only pay for what you consume and can switch providers without contracts. Subscription services, however, offer recurring monthly data allowances, perfect for frequent travelers or stays longer than a week, ensuring you never run out mid-journey. The trade-off is commitment: subscriptions lock you into a plan and provider, while top-ups let you adapt on the fly, but require manual monitoring.
- Top-ups suit sporadic, short-term travel where you control costs per trip
- Subscriptions excel for multi-country trips or remote work needing steady connectivity
- Top-ups avoid rollover fees but may cost more per gigabyte than subscription bundles
- Subscriptions simplify management with auto-renewal, but require cancelling to stop charges
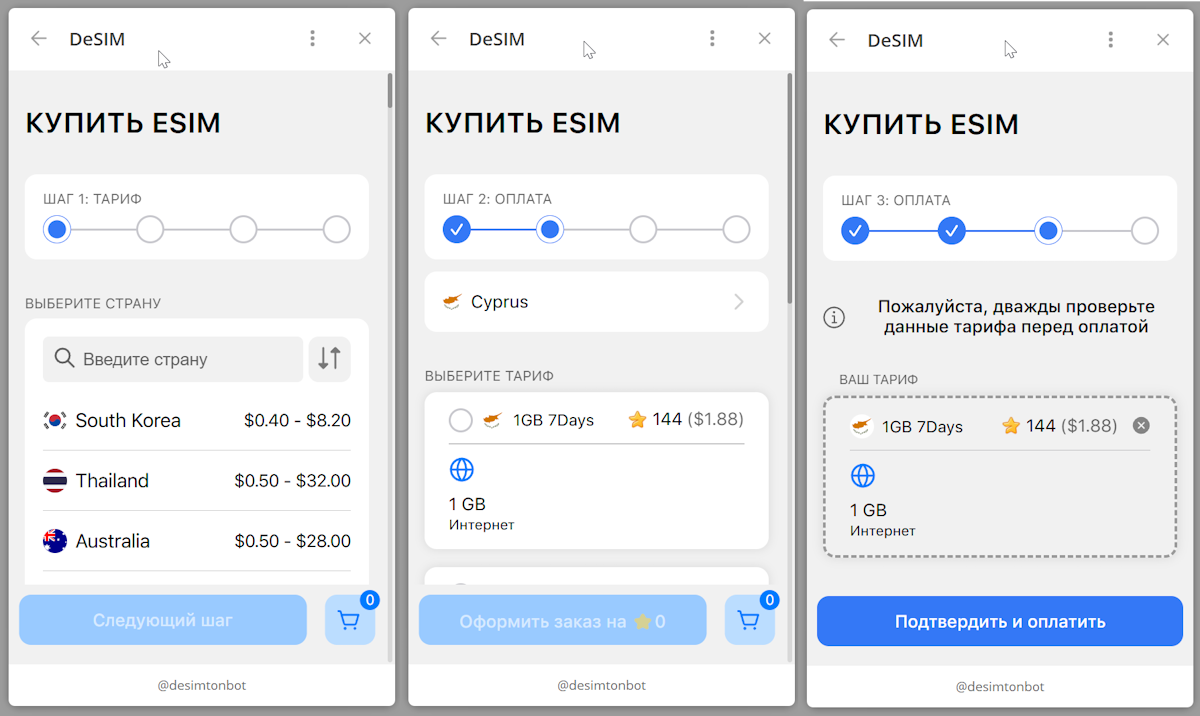
Step-by-Step Setup Prior to Boarding
Begin your eSIM setup prior to boarding by purchasing a travel plan from a compatible provider at least 24 hours before departure. Download the provider’s app or scan the QR code sent via email to install the eSIM profile in your phone’s cellular settings. Label the line distinctly (e.g., “Japan Data”) to avoid confusion later. Next, disable automatic network selection on your primary line and set the eSIM as the default for cellular data. Enable data roaming for the eSIM only. Finally, test connectivity by toggling airplane mode for 30 seconds before you leave home.
This pre-boarding routine ensures data activates the moment you land, eliminating airport Wi-Fi scrambles and local SIM hunts.
If your provider offers an installation guide, follow it exactly to avoid profile corruption.
Scanning a QR Code and Installing a New Profile
During pre-boarding setup, locate the eSIM activation email containing your unique QR code. Open your device’s Settings, navigate to “Cellular” or “Mobile Data,” and select “Add Cellular Plan.” Scan the provided QR code with your camera; the device will prompt you to install a new configuration profile. Confirm by tapping “Install” and enter any required passcode or confirmation. Once the profile is applied, you may label the line (e.g., “Travel Data”) before completing setup. This profile installation binds the eSIM to your device without a physical SIM swap, activating the data plan immediately for your destination.
Assigning Primary and Secondary Lines for Calls and Data

Before you board, designate your physical SIM for calls and texts to keep your existing number active, while setting your travel eSIM as the primary line for data to avoid roaming fees. Navigate to your phone’s cellular settings and select which line handles voice and which handles mobile data. Many devices let you choose a default for calls, but you can also pick a specific line per contact. Always enable data switching so your home line can still use the eSIM’s data when needed. This split ensures you stay reachable without incurring surprise charges.
Assign your home SIM for calls and the travel eSIM for data to avoid roaming fees while staying reachable.
Troubleshooting Failed Downloads in Airplane Mode
If an eSIM profile fails to download while in airplane mode, ensure your device has an active Wi-Fi connection, as cellular data is disabled by design. Re-enable mobile data after landing is often necessary if the download requires carrier network activation. Verify that airplane mode is toggled off temporarily for the download, then reactivate it for flight compliance. Check that your device’s eSIM manager app has permission to access storage and network, as restrictions can block installation. Restarting the device and retrying the download from your provider’s management portal typically resolves transient protocol errors during the initial setup.
Cost Comparisons Across Major Providers
When comparing eSIM for travel costs across major providers, price structures diverge sharply. Airalo and Holafly are the two dominant consumer choices, but their pricing models serve different usage patterns. Airalo generally offers cheaper per-GB rates on multi-day regional plans (e.g., Asia or Europe), making it ideal for light data users. In contrast, Holafly’s flat-fee unlimited data plans are more cost-effective for heavy streamers or business users, despite a higher upfront price for short trips. For global coverage, providers like Ubigi and Nomad often undercut both on single-country plans, especially in Japan and Australia. Do not assume a “global plan” is cheapest; always compare a region-specific plan against a local provider’s pay-as-you-go eSIM from eSIM.net or Truphone to see the real cost per MB for your destination and data volume.
Budget Providers Offering Affordable Data Packages
For budget-conscious travelers, providers like Airalo, Holafly, and Maya Mobile offer affordable data packages starting under $5 for regional access in Europe or Asia. Airalo’s pay-as-you-go plans, for instance, let you buy a 1GB, 7-day Asia pack for $4.50, while Holafly bundles unlimited data across multiple countries for a flat daily rate. Maya Mobile’s country-specific plans often undercut global rivals by tailoring coverage to local towers. Comparing these options directly helps you prioritize cost or data volume.
| Provider | Budget Tier | Best For |
|---|---|---|
| Airalo | $0.50–$3/GB | Short trips, low data needs |
| Holafly | Unlimited from $5/day | Heavy social media users |
| Maya Mobile | $2–$5 per GB | Single-country deep discounts |
Premium Carriers with Unlimited High-Speed Tiers
Among premium carriers, truly unlimited high-speed eSIM tiers remain rare for global travel. Providers like Truely and Holafly offer unlimited data, but their high-speed caps—typically 0.5–2 Mbps after a daily threshold (e.g., 500MB)—drastically reduce utility for video calls or large uploads. Airalo’s “Global eSIM” rarely includes unlimited high-speed; regional plans (e.g., Europe for $45/30 days) provide 10GB at full speed, then throttle. The practical cost difference is steep: global unlimited at reduced speeds can cost $30–50/week, yet a 5GB tier at genuine 4G from local-network partners via Ubigi may suit lighter users better.
Hidden Fees: Roaming Charges You Can Avoid
When comparing eSIM costs for travel, avoid traditional carriers that levy unexpected roaming fees. These hidden charges often activate silently when your phone connects to a foreign network. To bypass them, follow this sequence: First, disable data roaming on your primary SIM before departure. Second, check if your carrier charges daily pass fees, which can exceed $10 per day. Third, activate a travel-specific eSIM plan with a flat regional or global rate. Finally, confirm your eSIM provider explicitly lists “no hidden charges” in their terms. This approach ensures the upfront price is the total cost, preventing bill shock from undisclosed per-MB or per-minute charges.
Common Pitfalls When Using Digital SIMs Overseas
A major pitfall with eSIMs is assuming coverage matches your home network, only to find patchy service in rural areas. Always check the provider’s local partner carriers. Another common mistake is forgetting to disable your primary SIM’s data, which can trigger massive roaming charges. Even with a prepaid eSIM, accidentally toggling off “data roaming” in your phone settings can seem logical, but actually breaks the connection entirely. Buying a data-only eSIM without a local phone number can also mean failing two-factor authentication for banking apps. Finally, many travelers install the eSIM at home but don’t activate it until arrival, wasting the plan’s validity window.
Dual SIM Conflicts That Drain Battery Life
Using a digital eSIM alongside your physical SIM can lead to dual SIM battery drain when traveling. Your phone constantly searches for the best signal on both lines, especially abroad where networks differ. This dual scanning burns through power fast. To avoid a drained battery, check these common conflicts:
- Leaving both SIMs active when only one network is needed.
- Setting a weak or roaming network as default data, forcing constant reconnection.
- Not disabling your physical SIM’s data while using only the eSIM for travel.
Incompatibility with Certain Countries or Networks
Even the best travel eSIM can fail if it’s incompatible with local networks. Certain countries, like China or Iran, restrict digital SIM use entirely, while others may only support specific LTE bands your device lacks. Before your trip, verify your eSIM provider’s country list and your phone’s frequency bands. If your handset lacks critical bands (e.g., Band 28 for parts of Asia), you face dropped connections despite having a valid plan. Always cross-check carrier support for your destination—some providers work in cities but not rural areas, leaving you with zero signal.
| Issue | Practical Impact |
|---|---|
| Country Bans | No activation possible; you must use physical SIM |
| Band Mismatch | Slow speeds or no connectivity in certain regions |
| Carrier Restrictions | eSIM works only on specific partner networks |
Lost Access After Switching Devices Mid-Trip
Switching devices mid-trip often results in lost cellular access when the eSIM is not properly migrated, as most travel eSIMs are locked to the first device’s IMEI upon activation. If you transfer the SIM profile without first downloading the carrier’s settings onto the new phone, the network fails to re-authenticate the line. To avoid this disruption, always download the eSIM onto the replacement device while the original still has active data, then deactivate the profile on the old phone. Without this step, you may face complete inability to reinstall eSIM until contacting support for a remote reset, which can take hours in a foreign country.
Tips for Maximizing Coverage in Remote Destinations
To maximize coverage in remote destinations, first choose an eSIM provider that partners with multiple local carriers, giving your device automatic fallback options. Pre-download offline maps and essential apps before arrival, as data signals can be weak for streaming or large downloads. Manually select a network from the eSIM’s supported list if your phone struggles to auto-connect. Enable 3G or 4G fallback in your device settings rather than forcing 5G, which often has poorer range in wild areas. For true isolation, place your phone near a window or higher ground, and consider a dedicated external antenna for vehicles or base camps, as the eSIM itself cannot boost hardware limitations. Avoid background app refresh to conserve sporadic connectivity.
Choosing Providers with Strong Local Partnerships
When selecting an eSIM for remote travel, prioritize providers with deep local partnerships. These alliances bypass generic roaming, granting you direct access to a region’s dominant cellular infrastructure. Instead of relying on a single global network that fades in valleys, a locally-partnered eSIM dynamically switches to the strongest nearby tower—often from smaller, specialized operators that global giants ignore. For example, in Patagonia, a provider partnering with a local rural carrier delivers signal where standard international SIMs drop. Always check a provider’s partner network list before buying; it’s the difference between “no service” and checking your map from a mountaintop.
In short: strong local partnerships turn a generic eSIM into a tuned, region-optimized China eSIM lifeline for remote areas.
Backup Fallback Plans for Areas with Weak Signals
When traveling to remote destinations, your backup fallback plans for weak signal zones should include pre-downloading offline maps via apps like Google Maps or Maps.me before losing connectivity. For critical communication, store SMS-based contact numbers for your eSIM provider, as text messages often pass through when data fails. A multi-IMSI eSIM can automatically switch to a secondary network profile from a different carrier, maintaining basic data at slower speeds. Carry a printed list of local emergency numbers and offline copies of hotel confirmations, as digital access may be unavailable for hours.
| Fallback Method | Best Use Case |
|---|---|
| SMS via eSIM | Emergency contact with provider |
| Offline Maps | Navigation without data signal |
| Multi-IMSI Profile | Automatic network switching |
Using Wi-Fi Calling to Stretch Your Data Allowance
Activating Wi-Fi Calling on your device is a direct way to stretch your travel eSIM data allowance in remote areas. When you place calls over a lodge’s or café’s Wi-Fi, the call audio bypasses your eSIM’s cellular network, preserving your plan’s megabytes for critical tasks like navigation or messaging. This strategy effectively keeps your phone operational even when signal is weak but Wi-Fi is present. Unlike VoIP apps, Wi-Fi Calling uses your regular phone number, ensuring seamless communication without tapping your high-speed data bucket.
- Enable Wi-Fi Calling before departure to ensure it activates automatically when cellular signal fades.
- Use it for long check-in calls with family to avoid racking up international voice minutes.
- Turn off automatic app background data while on Wi-Fi to protect your remaining allowance.
- Test a short call after connecting to confirm your eSIM settings are routing voice over Wi-Fi.
What Makes a Travel eSIM Different from a Physical SIM
How a Digital SIM Profile Works Inside Your Phone
Key Differences in Activation and Setup Process
Why You Don’t Need to Swap Cards Anymore
How to Choose the Right Data Plan for Your Trip
